
Is there anything better than biting into a hot samosa and hearing that first crisp crunch?
For many of us, samosa and chai are an unbeatable combination. A rainy evening, a quick break from work, guests arriving unexpectedly or simply a craving for something spicy can all be good enough reasons to reach for one.
The classic samosa has a firm, flaky outer layer filled with spiced potatoes and green peas. Once deep-fried until golden, it is usually served with fresh green chutney or sweet and tangy tamarind chutney. Simple, familiar and comforting, it has become one of India’s most recognisable snacks.
Making samosas at home can seem intimidating, especially when you’re trying to get that perfectly crisp shell. But once you understand how the dough should feel, how dry the filling needs to be and how the samosas should be fried, the process becomes much easier.
This samosa recipe takes you through those details so you can make a batch that’s crisp outside, flavourful inside and perfect alongside a cup of chai.
What Makes a Good Samosa?

A good samosa is all about texture. The outer pastry should be crisp and flaky rather than thick or chewy. The filling should be generously spiced but not wet enough to soften the dough. And the whole samosa should hold its shape after frying.
The secret starts with the dough. Unlike some pastry recipes, samosa dough should be firm. Adding enough oil or ghee to the flour is also important because it helps create those flaky layers.
Then comes the filling. Potatoes and peas are the classic combination, but the spices are what give them their distinctive flavour.
Ingredients for the Dough and Filling
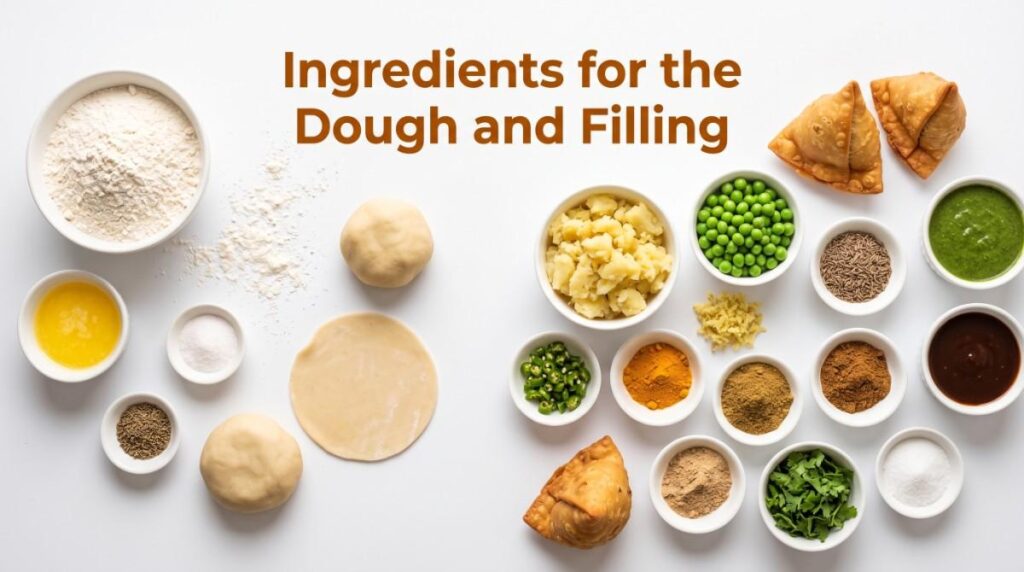
For the homemade samosa dough, you’ll need:
- 2 cups maida
- 4 tablespoons oil or ghee
- ½ teaspoon ajwain
- Salt to taste
- Water as required
For the aloo samosa filling, use:
- 3 medium potatoes, boiled and roughly mashed
- ½ cup green peas
- 1 teaspoon cumin seeds
- 1 teaspoon grated ginger
- 1 to 2 green chillies, chopped
- ½ teaspoon turmeric
- 1 teaspoon coriander powder
- ½ teaspoon garam masala
- ½ teaspoon amchur powder
- Fresh coriander
- Salt to taste
Keep some green chutney and tamarind chutney ready for serving.
Preparing the Samosa Dough
Add the maida, salt and ajwain to a mixing bowl. Add the oil or ghee and rub it into the flour with your fingertips until the mixture starts to feel crumbly.
This step shouldn’t be rushed. The fat needs to coat the flour properly because it helps create the crisp, flaky texture associated with a good samosa.
Add water little by little and bring the flour together into a firm dough. It shouldn’t be soft or sticky. Cover the dough and let it rest for around 20 to 30 minutes.
Making the Aloo and Peas Filling
While the dough rests, prepare the filling. Heat a little oil in a pan and add cumin seeds. Once they start to crackle, add ginger and green chillies. Add the boiled potatoes and peas, followed by turmeric, coriander powder, garam masala, amchur and salt.
Mix everything gently so that the potatoes remain slightly chunky rather than becoming completely smooth. Finish with fresh coriander and allow the filling to cool completely.
This is an important step. A warm or wet filling can make the dough difficult to handle and may affect the final texture of the samosa.
How to Fold a Samosa
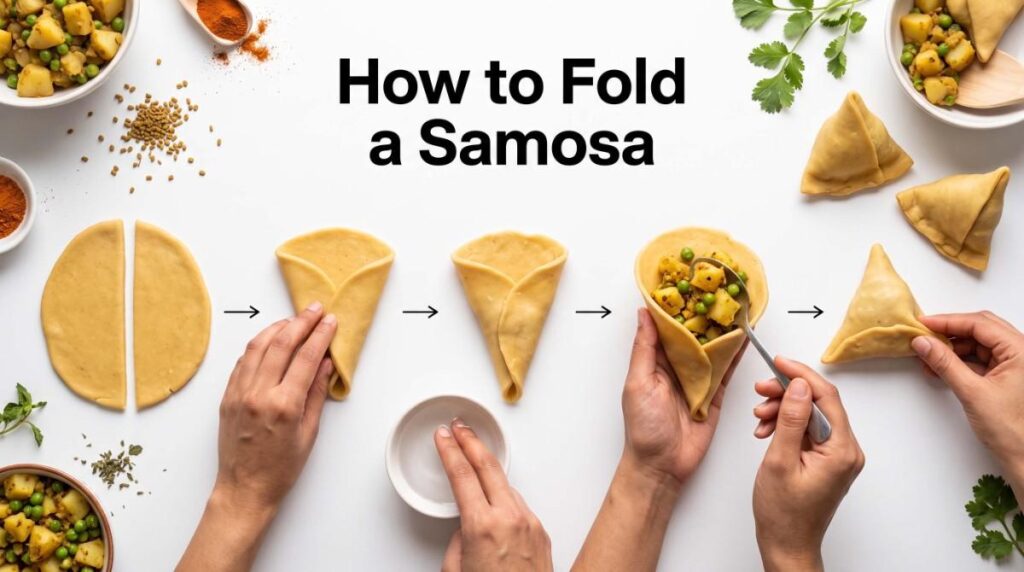
Once the dough and filling are ready, divide the dough into equal portions. Roll one portion into an oval shape and cut it into two halves.
Take one half and bring the straight edges together to create a cone. Use a little water to seal the overlapping edges.
Add the cooled aloo samosa filling, making sure you don’t overfill the cone. Leave enough space around the top to close it properly.
Bring the open edges together and press firmly to seal. Make sure there are no gaps or loose edges before frying.
If you’re new to how to fold samosa, the first few may not look perfect, and that’s completely fine. The important thing is that the cone is secure and holds the filling properly.
The Right Way to Fry Samosas
This is where patience really matters. Heat the oil over low to medium heat and carefully place the prepared samosas into it. Avoid dropping them into extremely hot oil because the outside can brown quickly while the dough inside remains undercooked.
Slow frying allows the pastry to cook evenly and develop a crisp, flaky texture. As the samosas turn golden brown, gently remove them from the oil and drain them properly.
If you’re aiming for a crispy samosa recipe, resist the temptation to turn up the heat just to make them cook faster.
Why Do Samosas Become Soggy?
There are several reasons a samosa can lose its crunch.
A dough that’s too soft or contains too much water can result in a poor texture. A wet filling can release moisture into the pastry. Frying at very high heat can brown the outside without properly cooking the dough.
Even covering freshly fried samosas immediately can make them soft because the trapped steam has nowhere to escape.
For the best results, keep the dough firm, make sure the filling is relatively dry and let the samosas fry slowly.
Can Samosas Be Baked Instead?
Yes, samosas can be baked or air-fried if you prefer an alternative to deep frying. Lightly brush them with oil and cook until the pastry turns golden.
They will still be delicious, but the texture will be lighter and somewhat different from the traditional deep-fried snack.
If you’re after the classic samosa experience with a rich, flaky crust, deep frying remains the traditional method.
Prepare Samosas Ahead of Time
You can prepare both the dough and filling ahead of time, which makes samosas much easier to manage when you’re cooking for guests.
Keep the dough covered so that it doesn’t dry out, while the cooled filling can be refrigerated in an airtight container. You can also shape the samosas a few hours before serving and keep them covered in the refrigerator.
Just make sure the filling has cooled completely before you start assembling them.
The Chutney and Chai Finish

A hot samosa is rarely complete without chutney. Green chutney adds a fresh, spicy contrast to the warm potato filling, while tamarind chutney brings a sweet and tangy flavour. Together, they make each bite more balanced.
And then there’s chai.
A crisp samosa dipped into a little chutney and followed by a sip of hot masala chai is one of those combinations that simply feels right. It’s why samosa continues to be one of India’s favourite tea-time snacks.
Conclusion
Making a good samosa is less about complicated cooking and more about getting a few small details right. The dough needs to be firm, the filling should be dry and flavourful, the samosa needs to be sealed properly and the frying should be slow enough to create that golden, flaky crust. Once you’ve got those basics down, this samosa recipe step by step becomes much easier to follow.
Whether you’re preparing them for a family evening, serving them at a gathering or simply craving something crispy with your chai, homemade samosas are always worth the effort. And when you’d rather skip the rolling, folding and frying, you can always head to Café Fu.D for a freshly prepared snack.
FAQs
Q: Why do samosas turn soggy instead of crispy?
Samosas can turn soggy if the dough is too soft, the filling contains too much moisture or the oil temperature is too high or too low. A firm dough, dry filling and slow frying help create a crisp crust.
Q: Can samosas be baked instead of fried?
Yes, you can bake or air-fry samosas after lightly brushing them with oil. They will use less oil, although their texture will differ from traditional deep-fried samosas.
Q: What’s the best filling ratio of potato to peas?
Around three parts potato to one part peas gives a good balance of texture and flavour. You can adjust this depending on your preference.
Q: How do you seal a samosa so it doesn’t burst while frying?
Avoid overfilling the samosa and use a small amount of water to seal the edges firmly. Check that there are no open gaps before frying.
Q: Can samosa dough and filling be made ahead of time?
Yes, the dough can be prepared and kept covered, while the cooled filling can be refrigerated in an airtight container. Both can be prepared a few hours ahead of assembly.





One Comment